HOW TO INSTALL THE RISE RELIANT TRIGGER
Congratulations on your new Reliant trigger! Before you begin uninstalling your old trigger and installing your Reliant Trigger on your Remington 700 or Rem 700 clone action rifle, please ensure that you’re practicing standard gun safety.

Make sure that your Rem 700 or clone action rifle is unloaded and pointed in a safe direction. Keep the safety in the on position until you’re ready to fire. If you run into any questions during the installation process, please don’t hesitate to give us a shout. Our customer service is available via phone (844-747-3308) or email ([email protected]) from 8:00 a.m.–5:00 p.m. (CST) Monday–Friday. We will be happy to help you along the way.
Regardless of whether you have a Reliant Pro or Reliant Hunter trigger, installation is based on the type of bolt-action firearm you’re using — a true, factory Remington 700 or an R700 clone action.
We recommend reading the installation instructions and/or watching the video prior to beginning.
– Reliant Trigger Installation Instructions for Factory Remington 700 Rifles
– Reliant Trigger Installation Instructions for Clone Action Rifles
Reliant Trigger Installation Instructions for Factory Remington 700 Rifles
Your Reliant trigger came with the following parts:
- .125″ punch — for moving the pins holding the trigger
- 5/32″ hex key — for separating the action and stock on your Remington 700
- 3/16″ hex key — for separating the action and stock on some clone actions (you won’t need this)
- .050″ ball-end hex key — for adjusting the pull weight on Reliant Hunter or the pull weight and overtravel on the Reliant Pro
Within the instructions, we’ll refer to front, back, left, and right.
- Front is closest to the barrel.
- Rear is closest to the stock.
- Right and left refer to each side of the rifle from the perspective of the stock (standard shooting orientation).
Be safe
It probably goes without saying, but always practice gun safety. Ensure your firearm is pointed in a safe direction and keep your trigger on safe until you’re ready to fire.
Before you begin the installation process, double check that the trigger is in the safe position. Remove the gun’s magazine. Visually and physically check the chamber and action to confirm the firearm is unloaded.
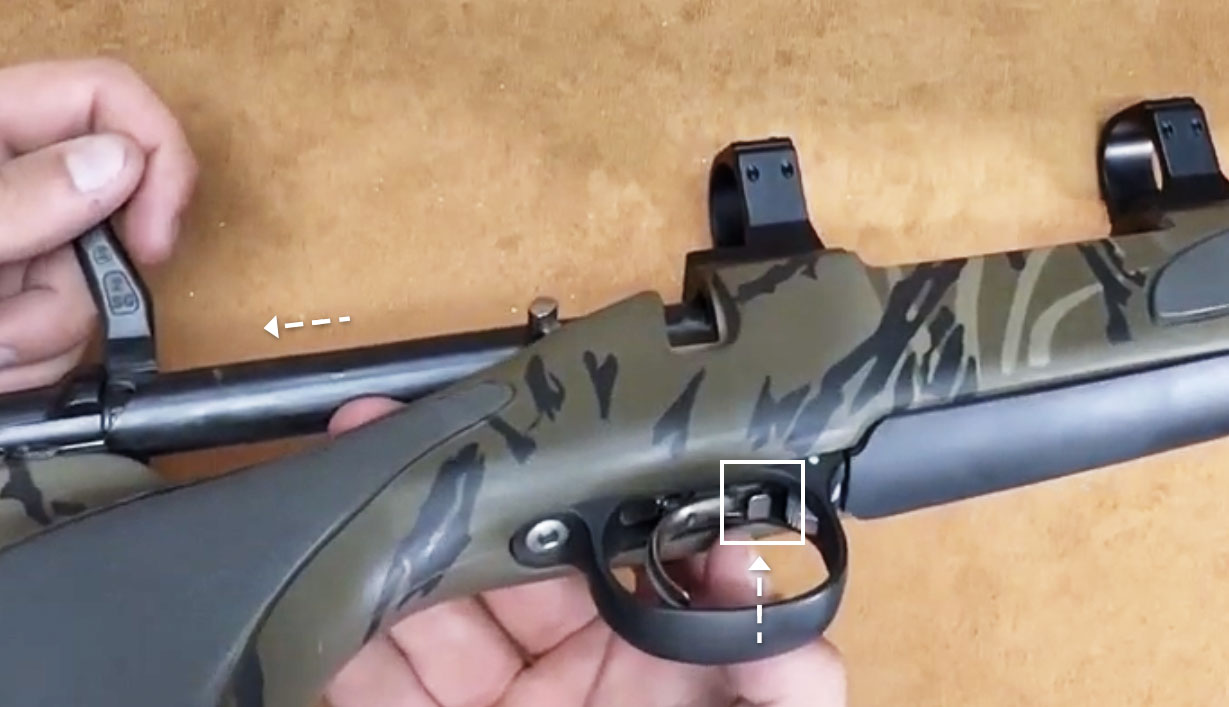
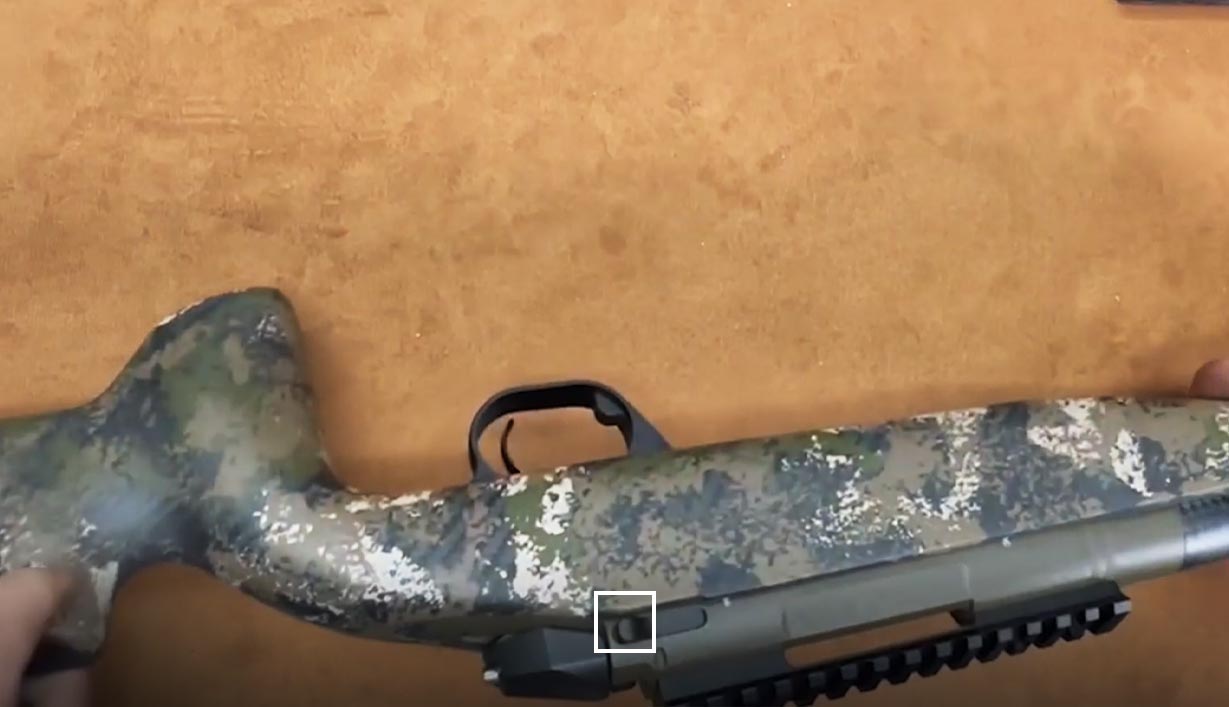
Remove the rifle’s bolt
Push up on the bolt release lever. It’s located in front of the trigger, inside the trigger well.
With the bolt release lever pushed, pull the bolt out of the action.
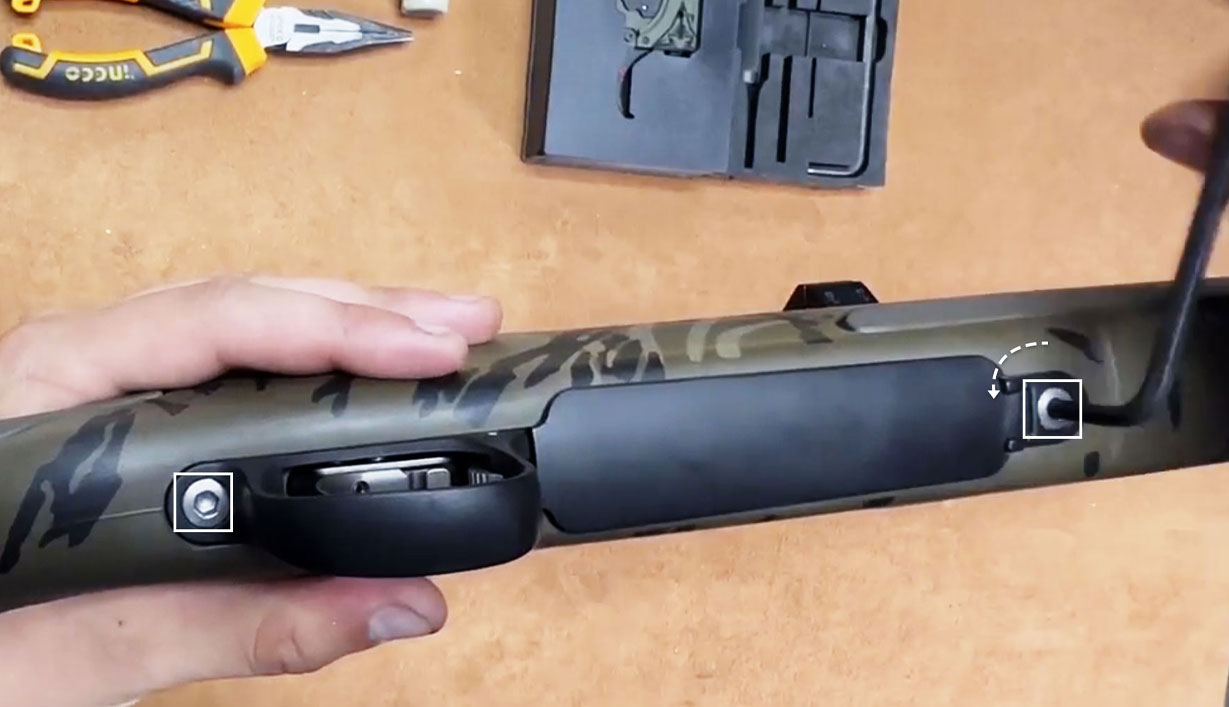
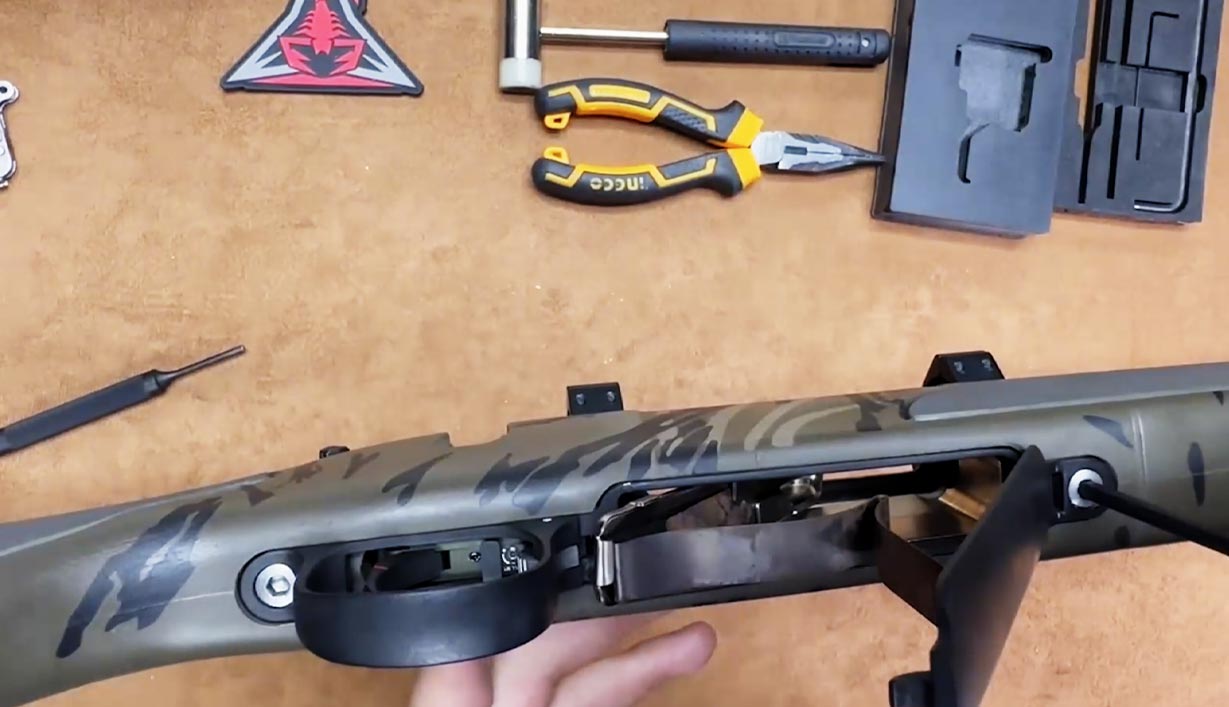
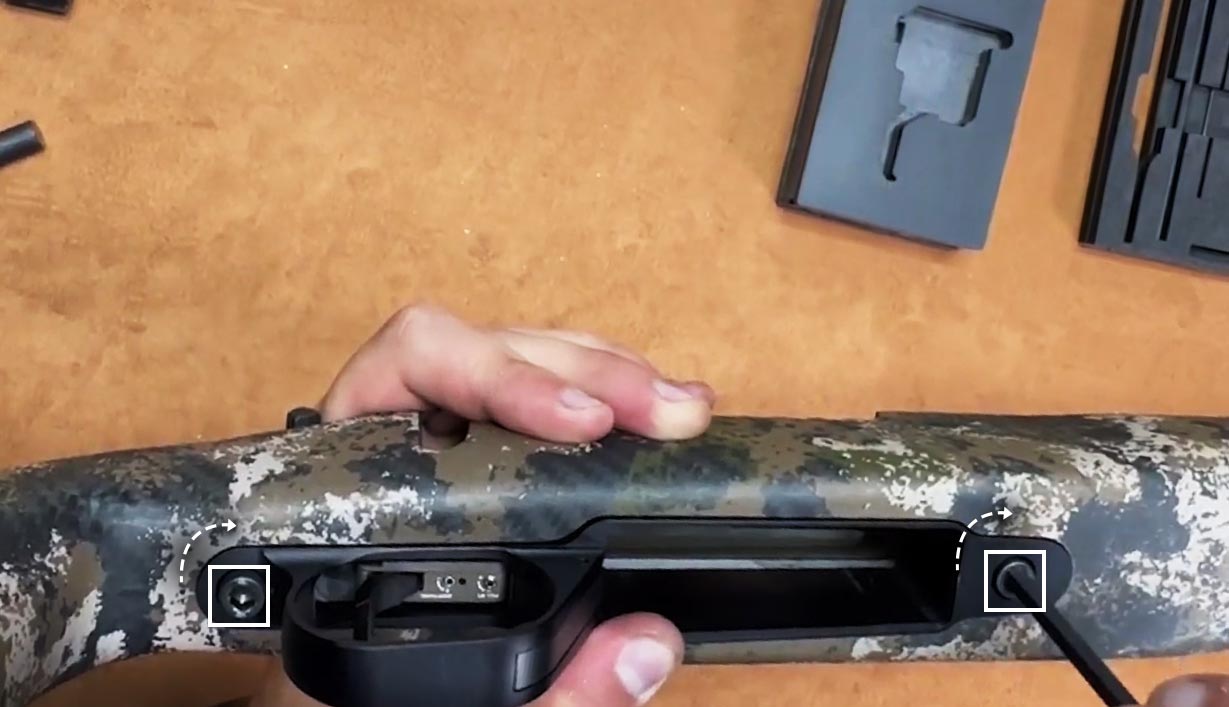
Remove the action from the stock
Turn the rifle upside down, revealing the bottom metal plate and two action screws.
Using the included 5/32″ hex key (the medium sized hex key), loosen the front screw on the bottom metal plate.
Using the included 5/32″ hex key (the medium sized hex key), loosen the front screw on the bottom metal plate.
Using the same hex key, remove the rear screw from the bottom metal plate.
Remove the bottom metal plate, box mag, and stock from the action.
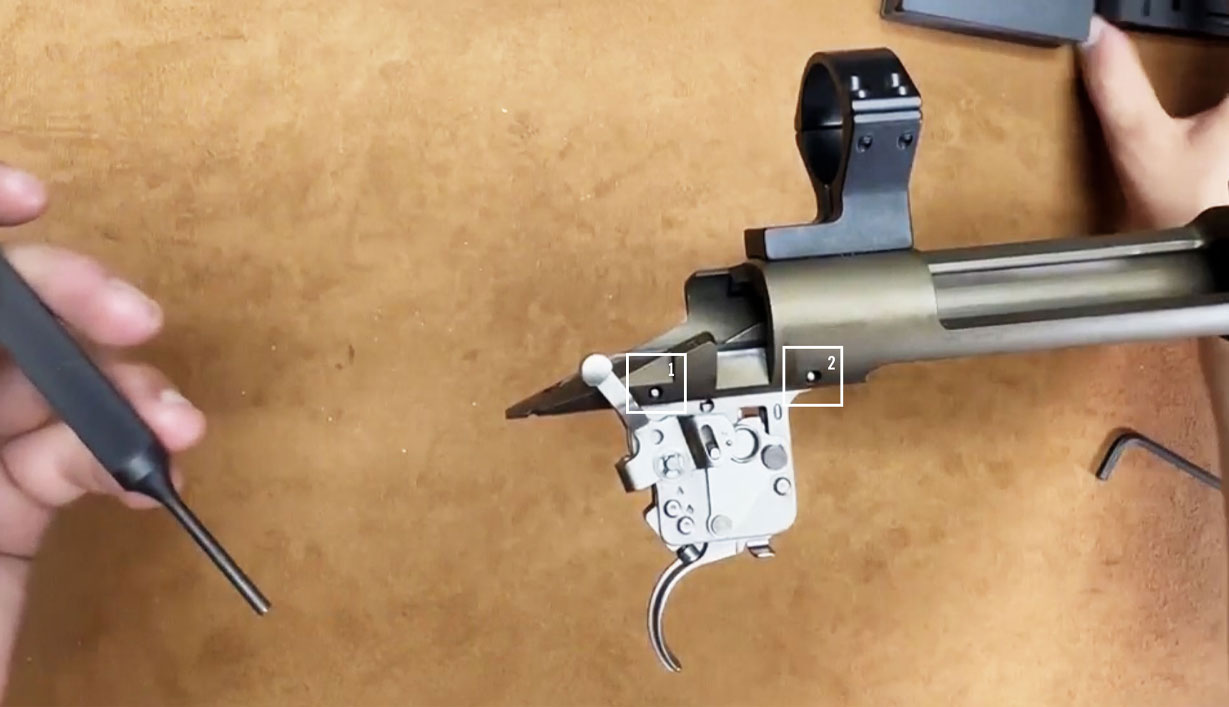
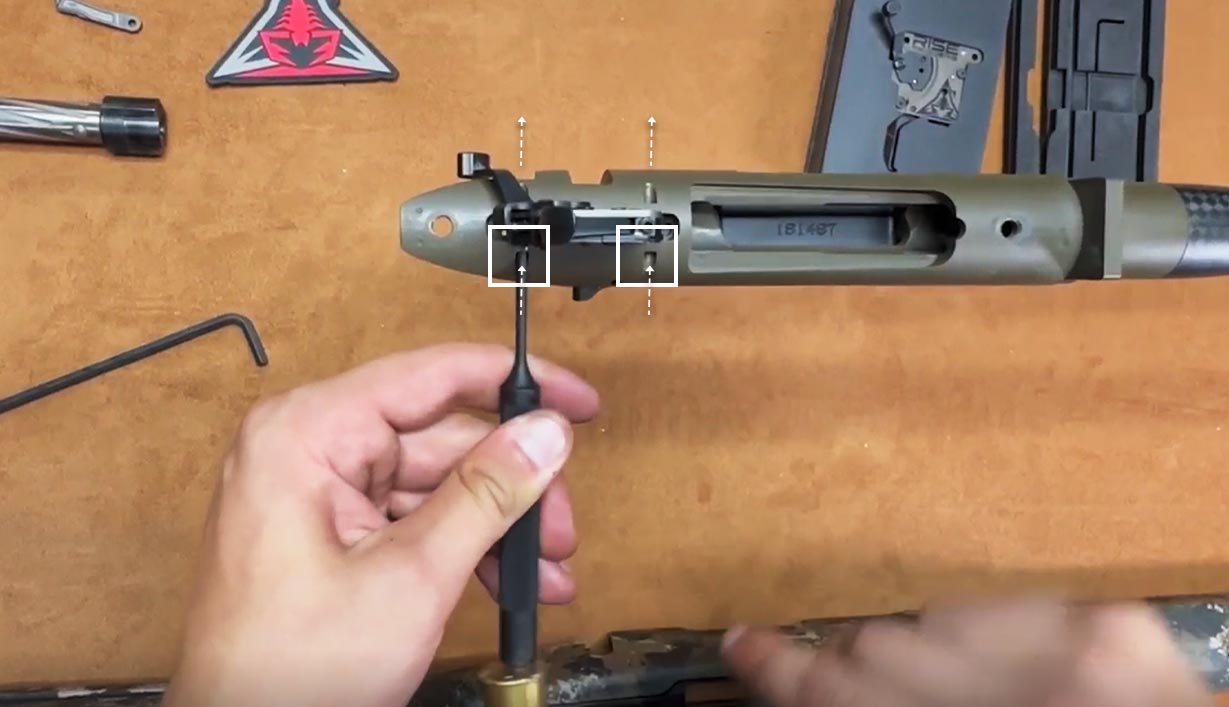
Remove the factory trigger pins and trigger
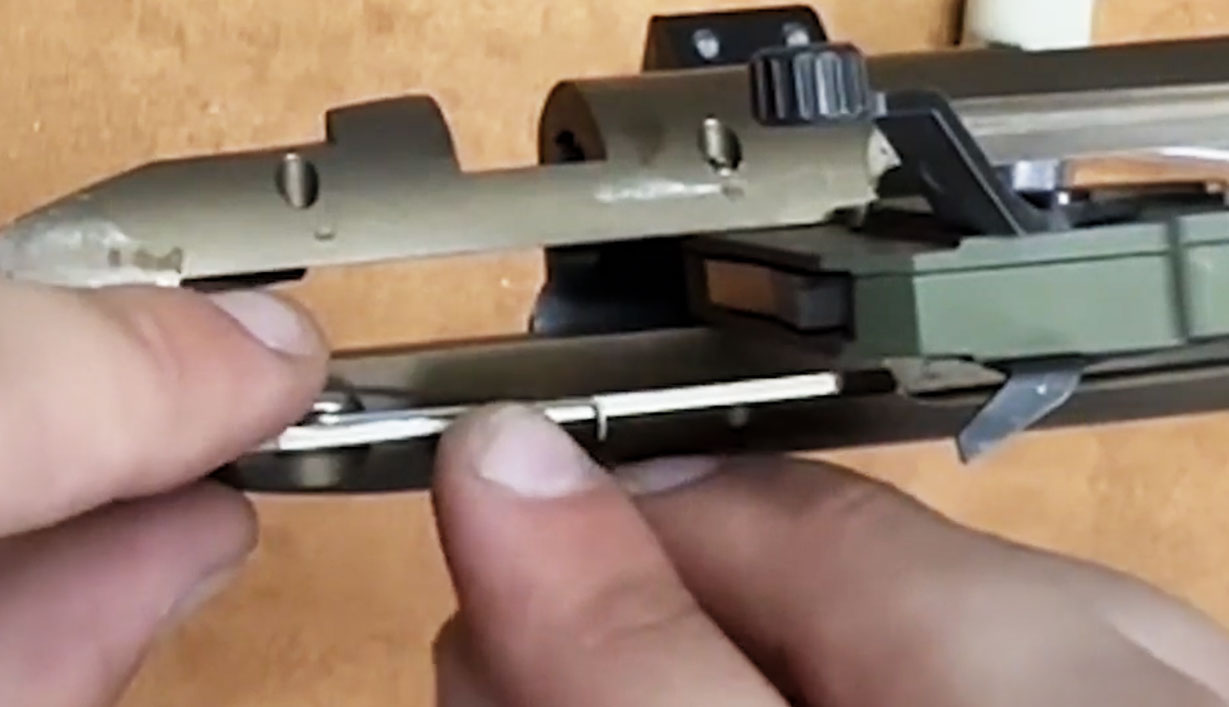
Using the punch, gently punch the rear pin from left to right until the trigger is free but the bolt catch assembly remains intact and is still held in its place with the pin.
Note: The trigger safety should still be in the on/safe position.
*Note: If the rear trigger pin is punched all the way out, the bolt catch and its spring may fly out. If this happens, make sure to retain these parts, as they are needed for installation of the Reliant trigger.
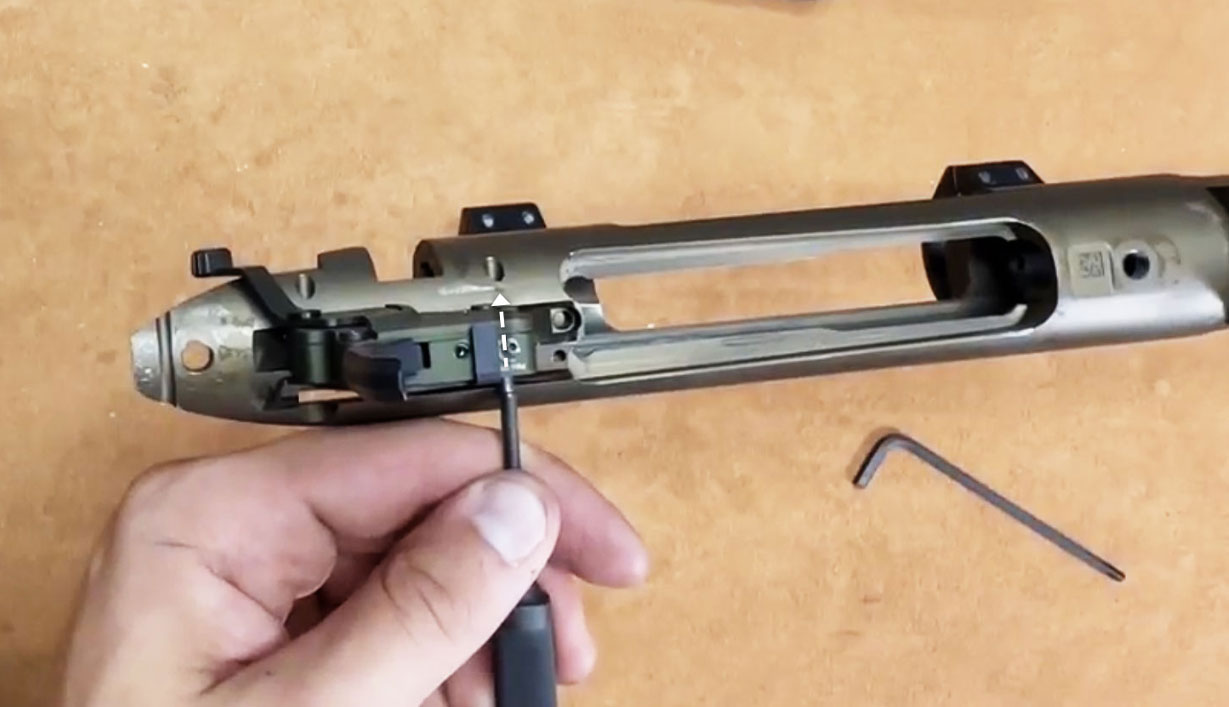
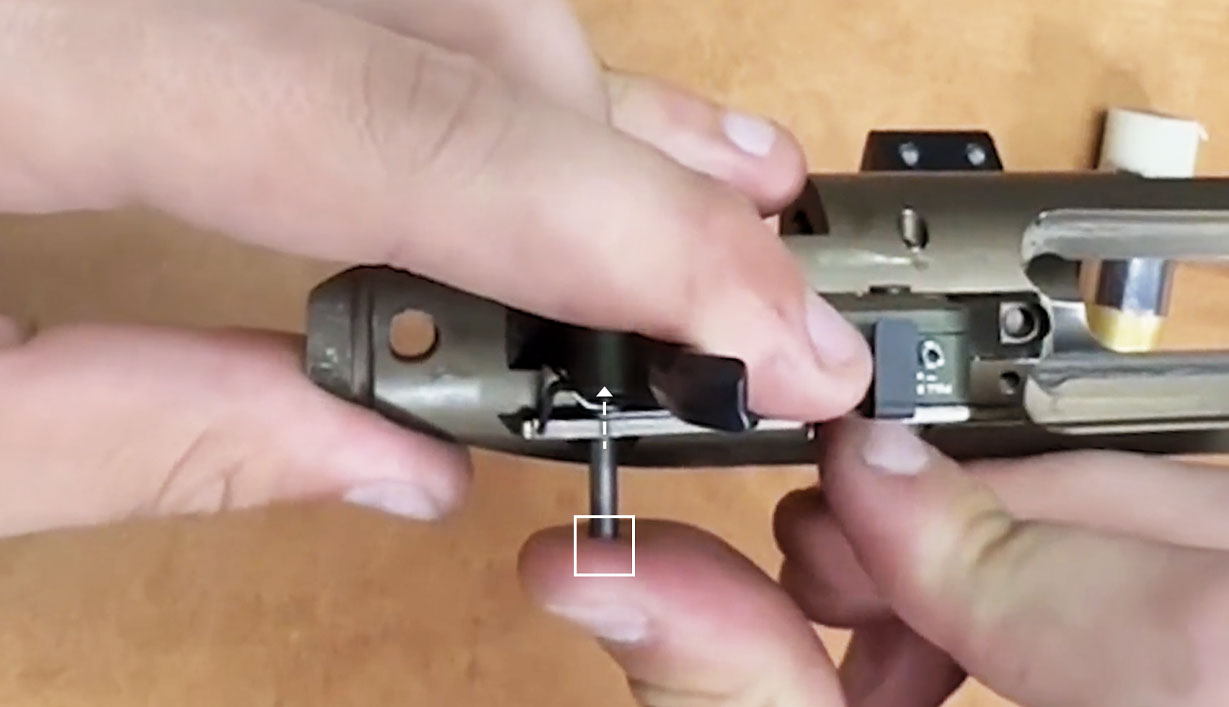
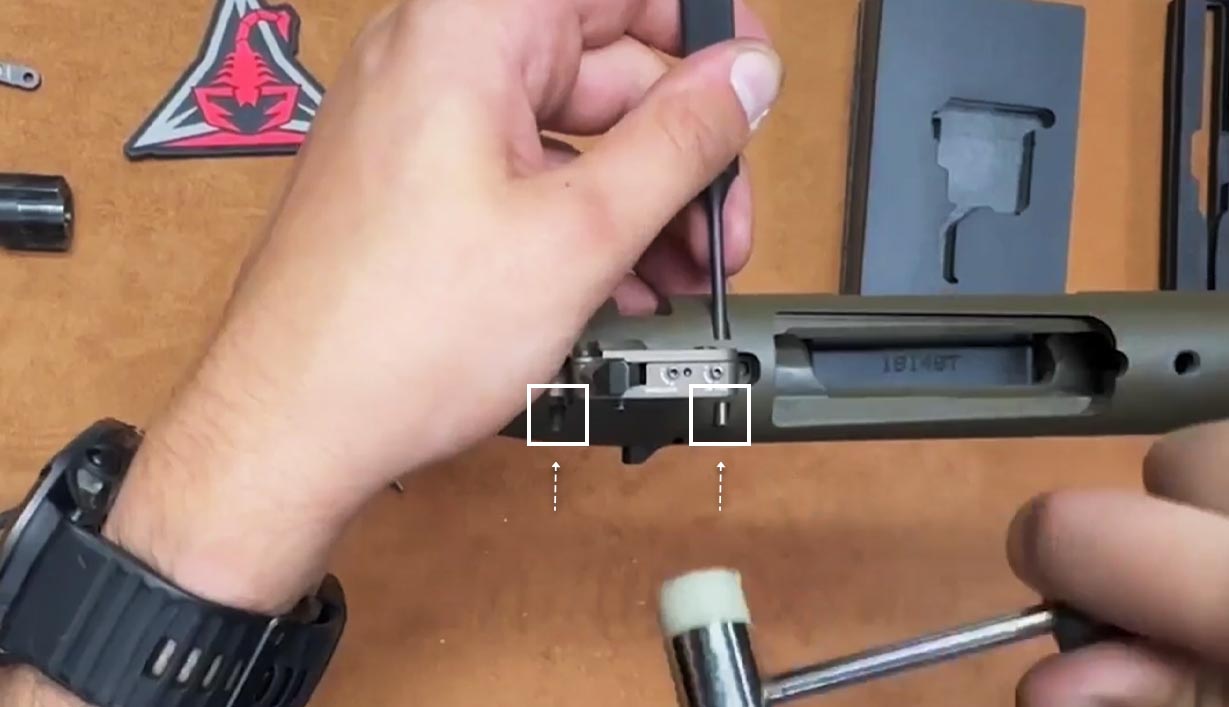
Using the included punch, punch out the front pin (the pin closest to the barrel) from right to left and set it aside.
Remove any trigger parts (factory trigger, trigger sear, and trigger spring) from the trigger well and toss them in the garbage.
Install the RISE Reliant trigger
Ensure the Reliant trigger’s safety is in the on position (rotated to the left).
Place the Reliant trigger into the trigger well and line up the pin holes.
Insert and gently punch in the front trigger pin until it is flush.
*Note: If your bolt catch and spring came out during uninstallation of the factory trigger, this is where you will re-install them. The long leg of the spring will run next to the bolt catch, the short leg will go into the trigger well, and the coil will go into the small pocket between the bolt catch and trigger well. Before you install the bolt catch and spring, pivot the Reliant trigger forward to clear the space in the trigger well for the bolt catch and spring.
Pivot the Reliant Trigger backward into the trigger well and line up the rear pin holes.
Gently punch in the rear pin from right to left until flush with the bolt catch.
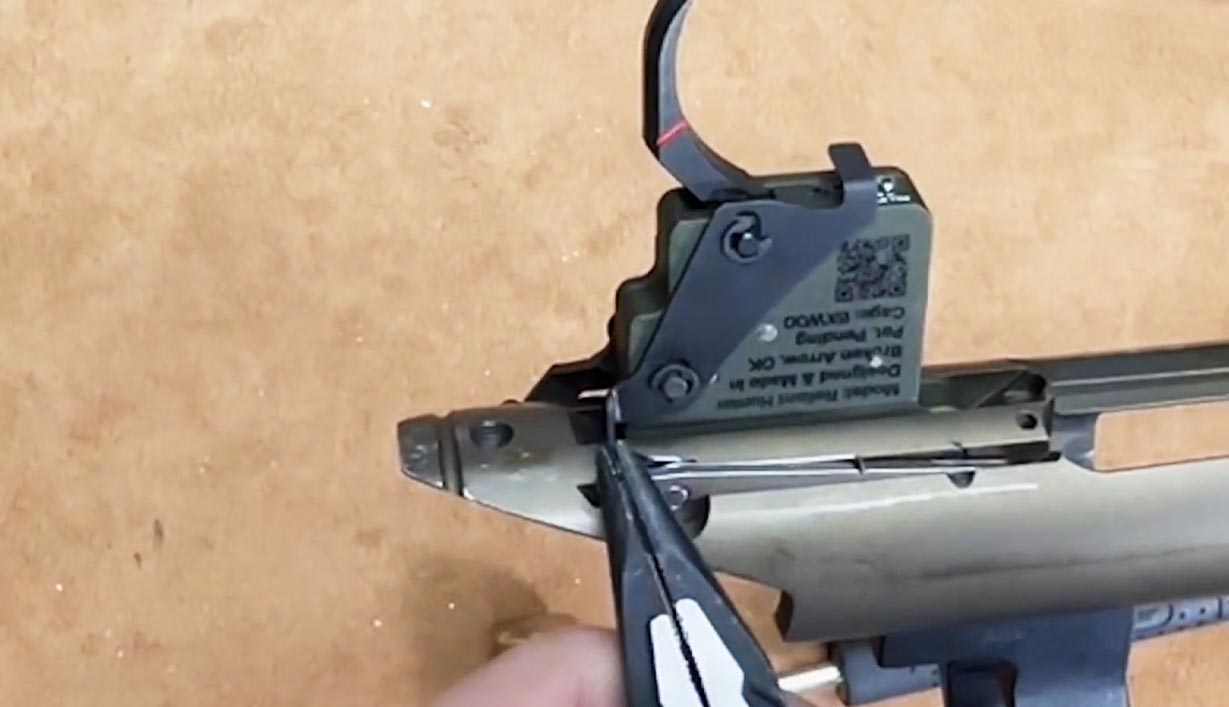
Confirm that the bolt release on the Reliant trigger lines up with the hook in the firearm’s bolt catch using the following steps:
- Using a pair of narrow pliers, gently bend the tab on the bolt release until it slots into the hook (or “V”) on the bolt catch.
- When resting, the bolt release should be seated in the hook of the bolt catch as seen in Figure B.
- Test to ensure the bolt release fully engages the bolt catch, functions smoothly, and does not stick when cycling. The bolt release should be in contact with the bolt catch throughout the cycle.
Reassemble your rifle
Re-insert the internal box mag (the side with the tapered edges will go into the action).
Install the front screw (the shorter one) and tighten until it is snug. Pressing the bottom metal plate down from front to back will make this easier.
Install the rear screw (the longer one) and tighten until it is snug.
Torque down both screws to the manufacturer’s recommendations.
Test functionality
Perform a function test without ammunition using the following steps:
- With the safety in the on position, cycle the action. The firing pin should NOT move.
- Move the safety into the off (or fire) position and cycle the action. The firing pin should NOT move.
- Move the safety into the on position, cycle the action, and move the safety to the off position. The firing pin should NOT move.
- Move the safety into the on position, cycle the action, and pull the trigger. The firing pin should NOT move.
- Move the safety into the off position, cycle the action, and pull the trigger. The trigger and firing pin should move.
- Move the safety into the off position, cycle the action, and tap the stock. The firing pin should NOT move.
Safely repeat steps 1-5 at a range with live ammo with the rifle pointed in a safe direction to ensure your Reliant trigger was installed properly.
Enjoy the best upgrade money can buy!
If you have any questions along the way or any issues with your trigger, please reach out to us. We’re here to help! [email protected] | 844-747-3308
And if you aren’t completely satisfied with your trigger, please let us know! All RISE triggers are backed by a lifetime warranty and are covered with our More-Bang-For-Your-Buck Guarantee. With the More-Bang-For-Your-Buck Guarantee, if your trigger doesn’t perform as we promised, just let us know within 30 days and we’ll buy it back or replace it. And with the lifetime warranty, if you ever encounter an issue with your trigger — regardless of how long you’ve owned it, or even if you aren’t the original owner — we’ll replace or repair it.
Reliant Trigger Installation Instructions for Rem 700 Clone Action Rifles
Your Reliant trigger came with the following parts:
- .125″ punch — for moving the pins holding the trigger
- 5/32″ hex key — depending on your rifle, you’ll need this or the 3/16 hex key to separate the action and stock
- 3/16″ hex key — depending on your rifle, you’ll need this or the 5/32 hex key to separate the action and stock
- .050″ ball-end hex key — for adjusting the pull weight on Reliant Hunter or the pull weight and overtravel on the Reliant Pro
Within the instructions, we’ll refer to front, back, left, and right.
- Front is closest to the barrel.
- Rear is closest to the stock.
- Right and left refer to each side of the rifle from the perspective of the stock (standard shooting orientation).
Be safe
It probably goes without saying, but always practice gun safety. Ensure your firearm is pointed in a safe direction and keep your trigger on safe until you’re ready to fire.
Before you begin the installation process, double check that the trigger is in the safe position. Remove the gun’s magazine. Visually and physically check the chamber and action to confirm the firearm is unloaded.
Remove the rifle’s bolt
Push down the bolt release lever. It’ll be on the left side of the action for right-handed actions or on the right side for left-handed actions. Pull the bolt out.
Remove the action from the stock
Flip the rifle over so you’re looking at the bottom.
Using either the 5/32¢¢ or 3/16¢¢ hex key, loosen the front screw on the bottom metal plate. (The hex key you use will depend on your rifle.)
Using the same hex key, remove the rear screw on the bottom metal plate and set it aside.
Remove the front screw and set it aside.
Remove the bottom metal plate and/or internal box mag (if applicable). If you have a chassis stock, you likely won’t have an internal box mag or bottom metal plate.
Remove the stock.

Remove the factory trigger pins and trigger
Note: Some rifles have a trigger hanger system. If the rifle has one, there will be a metal piece blocking your access to the trigger pins. In that case, unscrew and remove the trigger hanger system from the action to follow the standard steps to remove the old trigger and install the Reliant trigger. Tip: Make note of the hanger system’s orientation before removing it. You will need to reinstall it the same way.
Using the included punch, punch out the rear trigger pin from right to left.
Note: The trigger safety should still be in the on/safe position.
Set aside the rear trigger pin.
Using the included punch, punch out the front pin from right to left.
Set aside the front trigger pin.
Remove any factory trigger parts (factory trigger, trigger sear, and trigger spring) and toss them in the garbage.
Install the RISE Reliant trigger
Place the Reliant trigger into the trigger well and line up the pin holes.
Insert and gently punch in the front trigger pin until it is flush.
Insert and gently punch in the rear trigger pin until it is flush.
Reassemble your rifle and test your new trigger
Re-insert the internal box mag (the side with the tapered edges will go into the action), if applicable.
Install the front screw (the shorter one) and tighten until it’s snug. Pressing the bottom metal plate down from front to back will make this easier.
Install the rear screw (the longer one) and tighten until it’s snug.
Torque down both screws to the manufacturer’s recommendations.
Test functionality
Perform a function test without ammunition using the following steps:
- With the safety in the on position, cycle the action. The firing pin should NOT move.
- Move the safety into the off (or fire) position and cycle the action. The firing pin should NOT move.
- Move the safety into the on position, cycle the action, and move the safety to the off position. The firing pin should NOT move.
- Move the safety into the on position, cycle the action, and pull the trigger. The firing pin should NOT move.
- Move the safety into the off position, cycle the action, and pull the trigger. The trigger and firing pin should move.
- Move the safety into the off position, cycle the action, and tap the stock. The firing pin should NOT move.
Safely repeat steps 1-5 at a range with live ammo with the rifle pointed in a safe direction to ensure your Reliant trigger was installed properly.
Enjoy the best upgrade money can buy!
If you have any questions along the way or any issues with your trigger, please reach out to us. We’re here to help![email protected] | 844-747-3308
And if you aren’t completely satisfied with your trigger, please let us know! All RISE triggers are backed by a lifetime warranty and are covered with our More-Bang-For-Your-Buck Guarantee. With the More-Bang-For-Your-Buck Guarantee, if your trigger doesn’t perform as we promised, just let us know within 30 days and we’ll buy it back or replace it. And with the lifetime warranty, if you ever encounter an issue with your trigger — regardless of how long you’ve owned it, or even if you aren’t the original owner — we’ll replace or repair it.
Contact Us
Our inbox is always open. During business hours, we typically respond within two hours. Emails over the weekend will receive a response the next business day. [email protected]
Call
Monday–Friday
8:00 a.m.–5:00 p.m. (Central)
(844) 747-3308